Showing posts with label Tomatoes. Show all posts


Backyard Tomato Update


Photo by I. Stephens
So far it's been a better season for my tomato plants than for me, a mammal - lot's of rain and quite warm temperatures.  But I thought I would report on my lazy experiment of using the Japanese ring method  for growing tomatoes.  

Leftover  in my center planting bed from last year's climbing beans was a tepee with some pieces of 4" x 6" wire mesh still attached.  Before I finished  dispersing all my compost onto  other planting beds this spring, I realized that I could put the remaining compost in the center of the tepee and plant some heirloom tomatoes around the outside as if the tepee were a "ring" that is usually configured as a square filled with compost. I didn't have enough compost to fill the center area very high, but I did have enough to mound it up about 12".  The compost in the center provides nutrients and helps to maintain even moisture levels throughout the growing season.

From my perspective this approach to date has been successful. The Brandywine (pictured center), German striped (barely seen to the left with its fruit starting to ripen), Cherokee purple and Amish Paste (both out of view) are thriving. Fortunately, I left the pea trellis adjacent to the tepee; and now that the peas are gone, I've started directing the vines of the Amish paste and Cherokee purple onto it.

Of course, I would like to think of my other tomatoes, not pictured, as controls; but considering that their soil was treated to the same compost, they are staked and have received the same sun and rain, it would be naive to think that any differences between them and the "ring" tomatoes could be attributed to the latter's being near a lot more compost.   Anyway, so far I'm starting to think about utilizing  more Japanese rings next year and what that means for crop rotation.  I know it means replacing my tepees with open  square designs so that it is easier to add compost to and reach into those center spaces...


Coming To You Soon: Cross-striped Cabbage Worms


Photo by Judy Isacoff
A fellow master gardener recently alerted us to a new pest that may now be showing up on your cabbages and related veggies, the Cross-striped Cabbage Worm,  Piers rapaem, that has been discovered in the Berkshires and reported in a very informative posting in another local blog, The Berkshire Edge by Judy Isacoff. This insect has moved up from Virginia obviously seeking the new fake heat of the Northeast. Because  the adults only seem to  fly at night, you may need a flashlight to find the mothly version...


Programs at Demonstration Garden Programs


Two lecture and demonstration programs are scheduled during August by the Rensselaer County Cooperative Extension's Horticultural Program.  Both programs happen rain or shine at the garden located at the Robert C. Parker School located at 4254 Route 43 in Wynantskill (approx. 2.1 miles from the intersection of NY Rtes. 4 and 43).

"Late Summer Is For Lawns," slated for Tuesday, August 13 from 7:00 PM to 8:00 PM will be hosted by David Chinery, Rensselaer CCE's Educator and turf specialist.  David will discuss why mid-August to mid-September is the best time for lawn weed management, oveseeding, fertilizing and renovation.  Free free to bring samples of your problems in bags, pails or whatever to the  meeting.

The second program, "Great Tomato Tasting," set for Tuesday, August 20 from 6:30 PM to 7:30 PM will be presented by a group of Master Gardeners who will discuss growing tomatoes followed by a tasting table of the many varieties grown in this year's vegetable plot at the Demo Garden.
Garden Preparation - June

June! - Time to plant everything now because this is  the month to plant everything... Well, yes, but check that long range weather forecast just one more time.  It is possible for early June to be cool and wet with a few hot days sprinkled in. That combination happened in early May and  activated the  spores  of  Early Blight and  Downy Mildew in many gardens.  

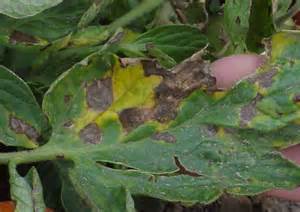
Early blight on tomatoes leave.
Source: Ohio State University
Early Blight (Alternaria solani) is a fungal infection that affects tomatoes and potatoes as well as  related plants such as eggplants and peppers.  It usually shows up as dark spots on the the lower leaves of plants and progresses upward. The dark spots will enlarge, converge and the leaves will eventually turn yellow and drop.

The fungi's spores live in the soil and can be spattered up on plants during overhead watering or heavy rains as well as  by wind. To control, or minimize, future infestations, infected plants should be removed and burned or buried. Although fungicides are available, they are expensive and need to be applied to the soil well before plants are growing in the garden, and they do not necessarily eliminate the disease.  Some tomato varieties are resistant to Early Blight. These include  a few like Defiant, Juliet, Legend, Old Brooks, Mountain Supreme, or Verona.


Downy Mildew identifies a group of fungal-like microbes that are triggered by cool wet spring conditions and affect even a wider range of plants   Upper leaf surfaces initially appear pale green or yellowish while the undersides start to appear white, light grey or brown. Eventually, these leaves whither, turn brown and die.
Downy mildew on cucumber.
Source: Cornell University
The spores of downy mildew can activate in soil as cool as 45° F.  The spores can live in soil debris for up to 15 years; and common weeds such as  sheperd's purse, wild mustand and pepper grass can serve as alternate hosts.  For both diseases the practices of  crop rotation, removing plant debris from garden beds and not adding infected plants to compost piles are important management techniques. 

However, in small backyard gardens implementing effective control measures are very challenging. Staking, pruning, mulching and watering at the base of plants or by soaker hoses will  reduce risk further; but given continuing periods of cool, wet weather, gardeners are bound to find these problems showing up.


Despite these depressing notes, here are a few other things you can do in June besides weeding and looking for the first seasonal garden pests:
  • Most vegetables can now be mulched with either compost or straw;
  • Add a side dressing of fertilizer - preferable an organic, slow release type;
  • Time to start second plantings of lettuce, radishes and other cool weather crops;
  • Plant beans, beets, carrots and squash; and
  • If you've planted tomatoes, put your stakes or cages in now while it's easy to avoid damaging the plants.


Gardening & Plastic

Source: phys.org
A few nights ago I attended a gardening program, and one of the discussions covered weed suppression and how to warm the soil in spring. Although a few gardeners mentioned using newspapers and cardboard for  weed control, most of us, including me, talked about putting down black plastic.  Later that evening, I started wondering about just how reliant gardeners are on using plastics and if I should  start feeling guilty about a possible plastic addiction.   

After a little investigation I started to feel a little better about my own use of plastics in gardening, but I did continue to be dismayed about the ongoing level of plastic litter being introduced into the environment by my species stemming from its collective greed and ignorance.

I recognize that many plastics are  well suited for their applications; and if societies reduced their fossil fuel energy needs and incorporated recycling   regimens into product life cycles, the continuing manufacture and use of plastics would not be  worsening existing environmental problems.  But now  to return to our gardens...

Gardeners are most likely to deal with three kinds of plastics: low-density polyethylene (LDPE), high-density polyethylene (HDPE) and polypropylene (PP). All three types, although   essentially not bio-degradable in the sense that they transform into organic compost, they are all re-cyclable materials.  

  • LDPE (Recyle Code #4) is  relatively soft, pliable, tough and chemically resistant to varying degrees to many types of chemicals.   LDPE gradually breaks down  over time when exposed to solar radiation  and releases small amounts of a few compounds such as methane and ethylene.   Gardeners using plastic sheeting to cover their plots are using LDPEs.

  • HDPE (Recycle Code #2) is both very durable and highly resistant to many chemicals. It is commonly used for storage tanks, furniture, piping etc. Gardeners may encounter HDPE in the form of  large planters & garden bed materials, hoses, and storage tanks (e.g. rain barrels). 

  • PP's (Recycle Code #5) characteristics are similar to the polyethylenes, but it is harder, almost as heat resistant, but more economical to produce. Probably the plastic trays and pots that most gardeners use or get when they buy plants are made from PP. 

In short, if conscientious gardeners simply  re-use and recycle their plastics, they may be able to feel less guilty about living in the age of plastics... but I must admit that the chore of cleaning  last year's shredded plastic sheeting from my garden before stuffing it in the recycle bin does  not especially inbue me with a lot of motivational energy. I will now try to remember not to yield to the temptation of simply hiding these plastics in the trash...


And remember:

"If it can't be reduced, reused, repaired, rebuilt, refurbished, refinished, 
resold, recycled or composted, then it should restricted, redesigned 
or removed from production." - Pete Seeger 


Frost Anxiety Time For Gardeners


It's mid-May and my tomatoes are itching to leave the grow lights and heat mats of my cellar and venture into the big time - the outside. I would like to reclaim my cellar space for some other projects, but Memorial Day is still almost two weeks away plus spring so far has been cool and very, very wet - far from ideal for tomatoes and other warm weather veggies.  My garden peas and radishes have sprouted; and the broccoli, parsley, kale and brussels spouts that I set out two weeks ago have acclimatized.  They  all exhibit a healthy green or bluish green, but new leaves are  developing very slowly. Although the risk of a late frost is receding as mid-May approaches,  frost remains a possibility. Gardeners need to take another patience pill before giving in to the demands of those anxious tomatoes!

Source: FamilyFoodSecure.com
But, if you do feel compelled to set your tomatoes outside now, place somekind of a cover over them. Gallon milk jugs will work as hot caps for a few plants; or, if money is no object, set up a  row covering with polyethelene (PE) film. [Note: Be sure to use aluminium or wood framing because PVC piping may interact with the PE film and deteriotate the film.]

Unless the long range forecast during week preceding Memorial Day promises a warm spell for the week following the holiday, my tomatoes will remain indoors until the 31st this year! Oh yes, my plans are, of course, subject to change.

If you want to learn more about tomatoes, Rensselaer County's Cooperative Extension will be presenting a program on Tuesday, May 21 at its Demonstration Garden located at the Robert C. Parker School, 4254 Route 43, Wyantskill (East Greenbush). The program is entitled, "Starting Right with Tomatoes," and starts at 7:00 PM rain or shine.  Bring a  dry soil sample from your garden and get a free soil test!

Veggie History: New Zealand Spinach

If you are looking for an easy heirloom vegetable to plant this spring either in your garden or a container, try Tetragonia tetragonoides, or New Zealand Spinach.

NZS is native to Australia and New Zealand. Supposedly, Captain Cook and his crew cooked and ate it to minimize the effects of scruvy, but it fell to  Jospeh Banks, the English botanist-explorer who developed much of the Kew Gardens in London during the late 18th century, to introduce the plant to Great Britain.

New Zealand Spinach is not related to our familiar garden spinach (Spinacia oleracae) that frequently appears  in omelets and salads. It is actually a member of the fig-marigold family (Aizoacae).  As an editable plant, New Zealand Spinach has many desirable characteristics: the bright green leaves and stems are succulent; it's very tolerant of hot weather, and insects and slugs don't like it. Just a few plants   can produce a thick, prodigious cover of tender vine-like stems and leaves, BUT NEW ZEALAND SPINACH  IS NOT TO BE EATEN RAW because it contains oxalates. [Oxalates also occur in rhubarb and can contribute to the  formation of kidney stones.] However, NZS's oxalates can be removed by soaking the greens in boiling water for a minute and then rinsing them in cold water before their final cooking.

If you let New Zealand Spinach go to seed, it will reseed in our climate.  Many, many years ago in another place and time, I naively planted a row of NZS in a garden; and I had volunteer NZS popping up for years.  I recommend limiting yourself to a few plants confined either to a large pot or hanging basket.


And remember:

"I'm strong to the finish, cause I eats me spinach..." - Popeye


Tomatoes - Focus at Demonstration Garden


This year’s Vegetable Garden at the Rensselaer County's Cooperative Extension Demonstration Garden will focus on tomato varieties. With 11 raised bed plots our Master Gardener volunteers hope to grow as many different varieties as possible. So far, varieties such as ‘Sungold”, ‘Black Pearl’, ‘Goldie Yellow’, ‘Paul Robeson’, ‘Gardener’s Sweetheart Cherry’, and ‘Weisnicht’s Ukrainian’ will be included. 

As part of our goal  to reach out  to and assist other tomato lovers in their pursuit of the perfect fruit, we have also scheduled two programs  at the Demonstration Garden this spring. The first is on May 21st at 7 PM and will focus on proper growing techniques, such as pruning, staking and fertilizing. The second program will be on August 20th. We plan to show off our beautiful plants and sample as many varieties as we can. If you live in the area, please join us. The programs are free.

The garden is located at the Robert C. Parker School on Route 43 in Wynantskill, NY and also features dedicated gardens culinary herbs, ornamental grasses, fragrances, prairie species and butterflies.  

Submitted by Nancy Scott,  Master Gardener

Garden Preparation - April


At last it's time to give in to some of your stronger vegetable gardening urges! If you haven't already started, here's a short list of things to -- assuming that you've completed preparations for March...


  • Yes, yes - start those tomatoes and other warm weather plants now in your cellar or on the table by the window. Remember to keep the soil warm and moist. 


  • As mentioned here last year, as well as in probably every other gardening blog for the great Northeast, plant your peas, parsnips and spinach outside.


  • If they're ready, set out broccoli, cabbage  etc. 

      • If you want to protect these plants from root maggots in an organic manner, consider employing a maggot mat.  Unlike a collar around the stems as a shield against cutworms, the mats are laid  tightly flat around the stems. [Use a heavy paper or landscaping cloth slit into the center with just enough of a hole for the stem.] Root maggots are the larvae of small black flies that lay eggs around the stems. By using a mat you can prevent the hatchlings from first burrowing into the ground and then burrowing into the plants.
    • If you already have seedlings started in small cell or plug flats, for example, remember to transplant them to larger containers after their first true leaves appear.  Containers between 3" x 3" and 4" x 4" should serve the purpose.
    •  If your garden soil is no longer wet, i.e. it doesn't stay in a ball when you pick up a handfull and gently squeeze it, you can now add your compost.  This will give the compost a headstart on starting its final decomposition making more nitrogen available.

    Selecting tomato plants

    As the month progresses, if you haven't started tomato seedings, you might  be feeling guilty and starting to  think about buying tomato  plants  now appearing like weeds in garden centers.

    Resist those urges to buy. It's still too early - you will need to keep them warm & moist probably indoors until the end of May. [You will be able to buy plants from at a local  farmer's market well into June.


    But, if you can't resist your urges, at least follow the advice of Craig LeHoullier (Epic Tomatoes, 2015) and DON'T BUY plants that:
      • Look too big or look too leggy for their pots;
      • Show discoloration or any blemishes on their leaves or stems;
      • Have flowers or small fruit; or
      • Look crowded or wilted.
      • and, I would add, don't be afraid to ask where the plants come from... A  local source, not Canada or North Carolina, is preferable because the plants will be more acclimated and are less likely to have pests and diseases from those other locations.

    Seed Saving Suggestion

    I recognize that not many garderers now might  be thinking about saving seed but it just recently occurred to me that instead of either throwing out or recycling all my plastic pill vials, I could, at least, reuse some of the larger ones for saving seeds.  [I wouldn't  be surprised if I were actaully the last gardener in Rensselaer County to realize this  repurposing of these amber colored containers, but in case I'm not the last one...] I always have some seed packets that are torn or worse for wear at the end of a season that have left over seeds in them or sometimes I have heirloom (non-hybrid) seeds that I want to save. Anyway, just a thought...

    And remember...

    "April prepares her green traffic light, and the world thinks GO." - Christopher Morley

    Book Recommendation - Epic Tomatoes


    Spring, when gardeners and vegetable eaters turn their fancies to tomatoes...

    Epic Tomatoes - How to Select & Grow the Best Varieties of All Time by Craig LeHoullier (Storey Publishing, 2015) is a beautifully designed and illustrated book about tomatoes. In fact, it is visually mouth-watering and clearly reflects the author's professed passion.

    LeHoullier has been growing tomatoes for 35+ years. His specialty is heirloom tomatoes -- he is, btw,  responsible for the naming of the Cherokee Purple way back in 1990. He also authors a blog, and his website  includes many videos about basic gardening techniques.

    All  aspects  of growing tomatoes  from starting seeds to saving seeds for next year's harvest are, needless to say, thoroughly covered for backyard gardeners in this book. Although Epic Tomatoes describes the characteristics of  250 tomato varieties, LeHoullier  clearly favors the heirloom types.  He also slips in  a handful of recipes and a little information about preserving, but these topics are clearly secondary to his simply wanting to help gardeners grow and enjoy the fruits of Solanum lycopersicum.


    LeHoullier breaks up the major sections of Epic Tomatoes by highlighting the superior features of each of his ten favorite heirloom varieties. The sections on pests and diseases cover the most likely problems a backyard gardener may encounter. Symptoms and solutions are well explicated and  the accompanying illustrations are unambiguous.  These along with a few other miscellaneious topics are further augmented by another section  consisting of  answers to gardener submitted questions that is reminescent of James Underwood Crockett's Victory Garden books.

    For beginning  gardeners his advice about using containers applies not just to tomatoes but to using  containers in general is right on target - although most gardeners will probably choose not to convert their driveways into container garden sites.  LeHoullier also mentions how to use straw bales in lieu of planting beds for tomatoes, but you may want to checkout the fuller treatment concerning straw bales in his second book,   Growing Vegetables in Straw Bales - Easy Planting, Less Weeding and Early Harvests.  For the truly curious gardener, he even discusses how to breed your own varieties.

     In short, if you know a gardener and are stumped  about what to give them sometime for a present,  give them this book.  They will thank you and hopefully share their tomatoes with you!


    And remember...

    "To grow a tomato or a pepper and prepare a meal from your labor
    and care is primordially satisfying." - Neil Newman


    Late Summer Garden Experiences


    Late summer gardens, unfortunately, require sustained work.  If you didn't plant those second crops for   fall harvests, don't be discouraged by what now seems like just extra effort for clearly diminishing returns.  Gardeners, like old men planting trees, must be  optimistic in  believing that any work done now is really for the next growing season...

    Brussels sprouts  Update

    Sprouts forming in response to top pruning.
    Source: I. Stephens
    Three weeks ago I mentioned that my Brussels sprouts were not forming buds but exhibited extensive leaf growth due to the warm growing conditions.  I removed the top leaders; and presto, within two weeks the plants  refocused their energy into developing sprouts. The buds are now around 5/8"+ in diameter and still  growing. By sometime in October I'll have fresh sprouts ready to pick.  Occasionally some things I do, work out...

    Are Your Tomatoes Ripening Poorly?

    Two of my city friends this past week have asked me why their tomatoes were  not ripening completely.  The tops either remained green or just turned yellow.  [There is, of course, a lot about this topic on the Internet already, but we'll deal with their questions anyway...] 

    The sympthoms are commonly referred to either  as "green" or "yellow" shoulder respectively, and both are temperature related.   If tomato tops, i.e. the stem ends, remain green, it indicates that  chlorophyll is not breaking down as the tomatoes attempt to ripen due either to prolonged high temperatures or simply too much direct sun exposure (but not enough to cause sun scorch). High temperatures  suppress the production of lycopene, the chemical that makes ripe tomatoes red.   If the stem tops turn yellow, it means that  temperatures have been sufficiently warm  to  inhibit  lycopene production but not so hot as   to stymie the breakdown of  chlorophyll. The result is that  the tomatoes' carotene [yellow]  becomes visible. 

    Thus,  one of the interesting contradictions about tomatoes is revealed:  the vines like it hot to grow, but the fruit needs moderate temperatures  between 65°F and 75°F to ripen.  Backyard gardeners who over prune vines or remove foliage to "give the tomatoes more sun to ripen" are actually doing exactly the opposite of what the fruit needs to ripen fully!

    FWIW:  Most plants produce carotene; most animals don't.  In plants  carotene absorbs ultraviolet, violet and blue light and  transfers that additional solar energy to the plant's chlorophylls that produce sugars from carbon dioxide and water via the complexities of photosynthesis.  Humans along with most  other animals  obtain carotene either from eating plants or other animals. The carotene then is converted  into vitamin .

    You can attempt to  minimize your tomatoes' green or yellow shoulders either by providing some shade  in your garden or you can pick the fruit green and ripen it in your cellar as soon as  you notice that the  fruit is starting to look a little less intensely green. You can also just cut the green or yellow portions off of the fruit and devour the ripe red part.

    Although it simply has been hot this year, I know of gardeners and farmers in  rural parts of Rensselaer County whose tomatoes have  ripened okay -- although they have not all escaped  the early onset of late blight. I suspect that we urban/suburban gardeners are just dealing with the effects of the somewhat higher  temperatures that occur in heavily built up areas.

    Corn Stalks for Mulch

    A community gardener I know this year planted corn mainly to use as a mulch on an adjacent abandoned plot.  She knew that raccoons would probably get most of the corn, and her expectations about the critters unwillingness to share her corn were realistic;   but her decision to use corn to suppress next season's  weeds  suprised me.
     
    Corn - better for compost than mulch. Photo: I. Stephens

    Because corn stalks do not compress  much, their fiber  does allow for good aeration in mulch; but unless they are chopped up (or put through a chipper), you will be stepping on the stalks and the cobs for a long time.  In a vegetable garden the problem is that  pests and diseases that are attracted to or reside in corn will be left in your garden.  For this reason corn stalks are better if removed to your compost pile.  Farmers simply either plow the stalks into the ground or use it as feed.  In your compost pile the fibrous corn stalks will also provide a lot of potential carbon. This can balance the amount of nitrogen that fresh green materials, like grass clippings,  abundantly supply.

    If you are thinking about what types of mulch you want to use in your vegetable garden or around your ornamental plantings, checkout this U. of Missouri's website about the various characteristics of different kinds of  mulches.

    Bags For Butternuts

    Several years ago  when I first planted butternut squash in a new community garden plot, I lost a lot of squash to nibbling pests - probably an evil  combination of squirrels, chipmunks and mice.  An adjacent gardener suggested that I cover the squash with paper bags when they were starting to ripen as a means to discourage the nibblers.
    Paper bags covering squash. Photo: I. Stephens
    Given that I had lots of bags from various sources [because I never throw a good bag away], I tried it the following year.  To my surprise, it did dramatically reduce the damage from these competing harvesters; and I have continued to use the technique since with continuing good results.  The bags will not deter raccoons or the other usual critters from feasting once that the squash have been ripe on the vine for a while, but it buys the squash time to ripen and seems to give me just enough time to  harvest them.   Aestheticlaly, you really don't even notice the  bags while the vines are alive, and they actually keep their integrity through a number of rain storms. Although the bags are biodegradable and could be left in the garden to   decompose.   Because the bags might blow away if not secured, I remove them from the garden and add them to my compost pile when I detach the squashes from the vines.


    And remember:
    "We have neglected the truth that a good farmer is a craftsman
     of the highest order, a kind of artist." - Wendell Berry, Author & Environmental Activist


    Sun Scorch and Trench Composting


    Sun scorch. It's okay to eat with a little trimming.
    Source: gardeningthehudsonvalley.com
    So far August's weather leaves a lot to be desired - way too much rain and  very hot streaks followed by cooler and wet nights.  Although this has been good for my compost piles, it has badly affected my tomatoes and a number of other veggie favorites although the winter squashes seem to like it. 

    The excess moisture results in cracked tomatoes that are then exposed to bacterial infections.   Although  tomato vines grow okay in temperatures that reach into the low 90°s,  their fruit ripens best with temperatures in the 70°s! If you've been wondering why your fruit has been slow to ripen, that's the reason.  Want a little more info? Check this note from Cornell's Vegetable Program website.

    If you have over pruned your tomato vines or removed too many leaf stems to let more sun light shine on the fruit to hasten ripening, SURPRISE, you may be creating the conditions for "sun scorch."  High temperatures actually inhibit the production of the pigments that provide the glorious tomato red gardeners look for... Oh, well.

    Trench Composting

    A full trench ready to be covered.
    Source: flowering.com
    If you have a small garden AND possibly have some space in it now from your pulling up your blighted tomato vines or sun scorched fruit AND you still do not have a compost pile, now is the time to reserve a little of your precious  gardening space for compost.  Dig a trench about 12" deep (or just a small pit in a raised bed) leaving the excavated soil to one side and start dumping your vegetative table scraps into it. If you don't like the looks, simply cover the scraps with the soil that you left  along the side.  The  scraps will get a good start on decomposing.  In the spring, even if your trench is not full, plant a favorite vegetable parallel to the trench to benefit from the added nutrients.  

    Another approach to composting directly in your garden is called the "sheet" method.  Gardeners simply scatter their table scraps around the garden and then gently till them into the soil throughout the season. I do this with coffee grounds,  but I prefer trenching (or using a pit)...  

    FWIW:  Note that this photo shows corn cobs and corn husks as well as other whole fruits and vegetables. Leaving items whole will slow down their decomposition.  Corn cobs and husks will take 2+ years to rot. It's much better to to cut these scraps or stale vegetables into pieces to expedite composting.


    And remember:

    "Kings and cabbages go back to compost, 
    but good deeds stay green forever." - Rick DiMarinis, American author

    JULY - GARDEN PREPARATION


    Maybe July should be known as the "Keep Harvesting Month."   I hope you are keeping up...

      Dill.  Source: Public domain
    • This month you should be getting first pickings of bush beans, beets, summer squashes and  finishing up with peas as well as with your second or third  plantings  of radishes.
    • Enough dill weed should also be available by now for use in salads and salad dressings. I never have to plant dill because I always allow a few dills to go to seed and then scatter their seeds in a few areas in my garden for next year.  I freeze dill stems before they bloom in order to make a dilly vinaigrette in the off seasons.
    • Other herbs like marjoram, thyme, basil, parsely, sage etc. should also be mature enough for collection. Like with dill, I prefer freezing herbs to drying because their flavors are better.
    • Another task extending your time to enjoy in July's  heat is  to start  planting some of your fall crops especially beans, beets and cucumbers. It  is also time to put in  early autumn  cover crops, such as clover, buckwheat or a field peas  in unused or already harvested beds.  For additional information checkout the recent  post about cover crops.
    • Add more mulch  for weed suppression and moisture control, and while you are at it, July is a good time to  fertilize asparagus, eggplants and melons. Your leeks probably also will appreciate hilling them again.
    • Finally, keep removing new suckers from your tomatoes to keep the vines from taking control.  And speaking of tomatoes let's move on to tomato horn worms...

    If you've grown tomatoes for a while, you have probably come upon Manduca quinquemaculata   (i.e. tomato horn worm). They actually will also feast on peppers, eggplants, potatoes; and a cousin prevalent in the south, the  tobacco horn worm, prefers, you guessed it,  tobacco.  

    They are large caterpillars, but they blend in especially well on tomatoes. Usually you will first notice leaf stems that have been stripped of all tissue around their larger veins. The caterpillars are usually at some other location on the plant or an adjacent plant. You always wonder how you missed seeing them! The caterpillars, of course, start small  dining first  on the  lower leaves and then  moving higher as they grow to where you can notice their work.

    Five spotted hawkmoth. Source: Public domain
    If they survive, tomato horn worms  go underground to pupate in autumn and  transform into hawkmoths over the winter. Hawkmoths emerge between late spring and early summer to start their next generations.  These are  large moths  with wingspans up to 5". They are nectar feeders, and in the south and southwest they seek out plants with large white flowers, especially those in the datura genus  containing toxic alkaloid compounds that seem to intoxicate the moths. These plants may have   evolved  producing an opioid to promote their fertilization by addicting hawkmoths!

    Cotesia lavae feasting on a hornworm.
    Photo by I. Stephens
    Cotesia wasp.
    Photo by Betriz Moisset 
    In addition to us vegetable gardeners, the hornworms have a lot of other natural enemies.  One of these, the trichogramma wasp, a small parasitoid wasp that you probably will never notice, attacks the eggs laid by the moths near the base of their favorite plants.  The wasps' young feed on these eggs.  Another moth enemy that you have probably seen evidence of, is Cotesia congregata, a larger parasitoid wasp that lays its eggs in the skin  of the caterpillars. You will know that one of these fellows has been to work if you see a horn worm looking like the unlucky chap to the right.

    I always leave these zombies alone. After the wasp lavae finish consuming the worm's internal tissue, the carcass will fall to the ground; but more importantly, I will probably have a generation of worm hunters in my garden next year.


    And remember...

    "If you want to live and thrive, let the spider run and hide." - American Quaker saying


    CONTROLLING & SUBDUING TOMATOES in the GARDEN


    New Gardener Surprised by Unruly Vines


    Feral tomato escaping its cage,
    Source: scientificgardener.blogspot.com
    Recently I spoke with a new backyard gardener who mentioned to  me that last year his tomatoes  had gone wild  even after he had put them in cages. The vines  got "tangly" and had refused to stay in their cages. Had his tomatoes really gone feral?  

    Experienced tomato gardeners, of course, know there are two kinds of tomatoes: determinate and indeterminate. Determinate plants, e.g. Valley Girl, Defiant and Celebrity, typically grow to a height of around 3 - 4 feet, blossom and then all their fruit   ripens within  the space of 1 - 2 weeks.  Indeterminate plants, e.g. Beefsteak, Big Boy and most Heirloom varieties,  can grow  numerous vines from suckers that also turn  into vines of 6 - 12 feet or more. Both types can benefit from pruning; and for most of us with limited garden space, some additional  kind of vine management is also required.  Without gardener intervention neither type will look like the neat and tidy tomatoes you see in most Internet  or seed catalog pictures.

    Now in fairness to those of contrary opinion, I acknowledge  there are gardeners who claim that except for removing the lateral shoots from the bottom 10" of any tomato to promote better air circulation, pruning is not necessary. And, I also admit I never  pruned any tomato growing in my uncle's fields when I was younger,  but my uncle had a lot of space and a lot tomatoes and we just let them sprawl on the ground. We lost some tomatoes to slugs and to our clumsy footwork, but we were satisfied with our yields for market.

    The arguments in favor of some kind of pruning include that it increases the size of individual fruits by reducing the energy and nutrients otherwise devoted to plant growth,  allows for more exposure to sunlight   further minimizing the risk of disease from too much dampness, and finally pruning  simply fits the plant(s) to limited garden space.  However, pruning  implies that you also   do employ some kind of vine support. Keeping the fruit off the ground also decreases fruit loss from disease and damage from slugs and, maybe most importantly, avert some backaches later during harvest.

    Cages & Staking for Determinates


    Cages sometimes need to be staked to hold the fruit load.
    Source: oldworldgardenfarms.com
    By their nature, determinate tomatoes need less pruning to fit garden space then indeterminate varieties. The Internet is loaded with tomato pictures exhibiting various gardener techniques:  single and multi-stick staking, inverted and pyramidal cages, simple vertical fences and all kinds of trellises.   My experience with Celebrity tomatoes  is that cages generally need staking because heavy  fruit loads require that cages may also  need propping  up    even when I have limited plants to 4 shoots.  I also space the plants at 3 - 4  feet  intervals instead of the commonly stated 2 feet for determinate tomatoes because I like to be able to move around my plants easily as well as  to enable good air flow.


    Dealing with Indeterminate Varieties


    As we mentioned earlier, indeterminate tomatoes can produce long vines, and the vines will keep on growing and  trying to set new fruit until killed by frost.  Towards the end of a growing season it's a good idea to  clip off  vine leaders to stymie new growth and encourage   the plant to focus its energy on existing fruit development.  Because indeterminate vines can easily exceed 12 feet (20+ ft is not an uncommon length in green houses if a grower has pruned a plant to a single vine), it is necessary to provide a way to support (actually, suspend) the vine.  Cages are not a good choice for indeterminates. The cages available from many big box and retail nurseries, even the large economy size cages, are simply too small in my opinion, and way too expensive.

    Wow! Overhead trellis for a single tomato plant.
    Source: mothernaturenetwork.com
    If you trim  intermediate vines just to fit your cages, the yield will be greatly reduced; if you don't prune, the vines will continue to grow and either cascade down to the ground or land on an adjacent cage - soon creating a tomato vine jungle.    Staking is also possible, but requires you to make or locate stakes long enough to hold long vines. With stakes you can control vine spacing better; otherwise they really offer little advantage over  cages.

    That said,  some kind of trellising or fencing seems to be  better approach. Trellising also allows your imagination to get some exercise in design.  A trellis can be as simple as growing a tomato along a fence (assuming you don't need to worry about    either  wild critters or neighbors, both of whom probably like tomatoes).   Or,  a trellis can be a simple A-frame design with its cross pieces lashed  together for a season.  A-frame trellises are  popular in small gardens because they are quite stable, but  reaching some areas might not always be easy.

    Simple A-frame trellis.
    Source: freescortpost.com
    I think  a simple vertical frame (below right) is better. It requires less material and less space. You can also reach both sides easily. The major drawback of  a vertical design, however, is that the posts need to be firmly set because they will be exposed to  dynamic loading: vines + fruit multiplied by wind.

    For either an A-frame  or a vertical design you have choices about what to use and how to attach  cross pieces. In either approach you can use  cord, netting, wire cable or even sections of fencing   attached to the supporting frames to bridge the openings between posts. Another variation, if you choose to prune to a single stem, is to simply attach a top cross piece between posts and suspend  single strands from it for  vines.  The strands must be  firmly secured at the bottom to keep the vines from blowing in the wind.
    Simple vertical trellis.

    Source: tomatoville.com


    Last Words about Pruning 


    For determinate tomatoes in cages I usually try to limit a plant to 4 stems, but I do sometimes break my rule and go with 5 because I leave more  space than is commonly suggested;  and because I tend to have more tomatoes than I have cages, I keep a supply of stakes anyway. But that's pretty much all I do. Remember, the stems of these guys only grow to a set height and a set number of fruit.  By removing their side stems you are restricting how many tomatoes the plant will produce.  

    Add caption
    The indeterminate type, as already mentioned, are a different story. They will keep on growing and trying to start new vines.  These start out as "suckers" (see diagram below) at a node just above a  leaf stem.  When you are growing this type of tomato, your


    trellis or frame decision will determine what your pruning approach will be.  Allowing for 4 - 6 suckers   to develop  into vines is common.  But if you think your growing season is long and only have a couple of plants, then you   might think about letting a couple  more lateral vines develop.

    For commercial growers using support systems in either greenhouses, high tunnels or   the field, a 4 vine approach seems  to be considered the golden mean in that it balances  a profitable yield against  the labor costs involved in  attaching additional  vines to frames and  regularly pruning the to remove  their own  new suckers.


    And remember...

    "A good garden may have some weeds." - Thomas Fuller (1608 - 1661)


    VEGETABLE VARIETIES FOR GARDENERS (VVfG)

      
    VVfG is a citizen science project developed  by Cornell University's Cooperative Extension 
    to collect and share data about growing vegetables in New York State.
    ------------------------------------------------------------------------------------------------------

    Last Year's Experience: Lettuce, Tomatoes & Basil


    Last year my Master Gardener companions, Mimsy Pye, Marge Davey and I, experimented with Bed Number 1.  The Spring Plantings consisted of 3 varieties of leaf lettuces: Buttercrunch, Black Seeded Simpson, and Blade.  Because it was mid–May before we were able to plant the rows, we decided to put them along the outer edges of the 4ft by 4ft bed leaving room for the summer crop of tomatoes and basil in the bed's center.  

    It was interesting to compare the 3 varieties --  all planted at the same time and all growing under the same conditions.  The ‘Black Seeded Simpson’ by far out-performed the other 2 as far as yields.  However, it really did not have much flavor.  If you prefer the taste of your salad dressing, then this was the one for you.  ‘Buttercrunch’ had a mild buttery taste, with the best texture, forming more of a rosette type loose head. Dark red ‘Blade’ had a poorer germination rate, but was the most flavorful.  Red colored lettuces have more antioxidants and micronutrients than just plain green ones.   As it matured it did have a little more of a bitter flavor, but not as much as an escarole or radicchio.

    I think that it is worth noting that caring for these lettuces would have been different if they were in my home garden.  At home, one can easily check their garden every day or two, even with a busy schedule. The Demonstration Garden was not as convenient.   Thinning should be done on a regular basis, so that you have the benefits of nice tender baby lettuces, making room for the other plants to spread.  Too many plants together get leggy, with some leaves getting slimy.   

    Jasper on left responded to warming weather faster than the Brandywine on right.
    With the lettuces still growing, we planted a ‘Jasper’ cherry tomato and a ‘Brandywine’ heirloom tomato, as well as ‘Genovese’ and ‘Thai Sweet’ basil at the end of May. Last year’s spring in our neck of the woods was wet and cool.  This was good for the lettuces, but not the tomatoes and basil.  As the weather finally warmed, the tomatoes responded.  

    The contrast between the two plants was quickly evident.  The heirloom ‘Brandywine’ struggled to overcome the wet, cool spring.  It quickly developed early blight and remained somewhat stunted.  It produced very few fruits, with the earlier ones having little flavor.  The last one picked in a gloriously warm October was large and fabulous. It was so sweet and juicy with a deep rich tomato flavor.


      ‘Jasper’, an indeterminate new hybrid variety, outpaced the heirloom.  ‘Jasper’s’ disease resistance includes Early Blight, Septoria leaf spot, Fusarium wilt and Late Blight.  The plant quickly outgrew its 5 ft stakes by a good 2 ft.  It was covered with clusters of ¾ inch round, red fruits.  The taste was flavorful and sweet, but not quite as sweet as ‘Sungold’.  Harvesting at first was a little tricky.  Trying to pick the individual fruits caused them to split, making it easy to pop into your mouth, but hard to donate.  Snipping off the whole cluster kept them beautifully intact, and they kept quite well for a few days.  Like most cherry tomatoes, one plant is all you really need.


    The two basils struggled with the cool, wet conditions as well.  A few days of high temperatures in late spring caused them to go to seed.  Even with pruning, the ‘Thai Sweet’ never really recovered and had poor yields.  The “Genovese” did better, but it later became shaded by the ‘Jasper’, which also impacted its yields.  Frequent pruning can extend a basil plant’s life, but at some point it will get leggy and just keep producing flowers.  Again, a home gardener would constantly be doing this, adding the trimmings to some delicious dish. Once cut delicate herbs like basil don’t travel well, making them difficult to donate.  

    Pskem River garlic, early spring 2018.
    Cornell also called for a fall planting of  ‘Pskem River’ garlic but which they did not provide.  ‘Pskem River’ is a hard necked variety from Uzbekistan.  It has large purplish cloves, maybe 3-5 cloves per bulb.  It is supposed to have a strong flavor and grow well in our area.  I waited too long to buy it on line and it was sold out. However, I was delighted to find it at my local food co-op. 

    After cleaning up the tomatoes and basil in mid-October, the soil was prepped and along with a dusting of bone meal, the large bulbs were pressed into the soft earth.  I am happy to report that they made it beautifully through the winter, even though they were not mulched. 
    (More on garlic in a later post.) 


     So, that was last year’s experiment.  I can’t wait to see what this growing season will bring.


    Text and photos submitted by Nancy Scott, Rensselaer County Master Gardener