JUNE - GARDEN PREPARATION

Another month and still lots of garden  work to do [depressing sometimes thinking about it, isn't it], but some of us are near to or maybe already enjoying our  first harvests and breathing sighs of relief as early sowings  finally  emerged  and started to grow. In Rensselaer County, according to Cornell data, our growing degree days  finally  reached their recent 15 year average levels around May 7 after lagging behind  10 - 12 days from recent  years. In short, April  and early May stayed darn cool.

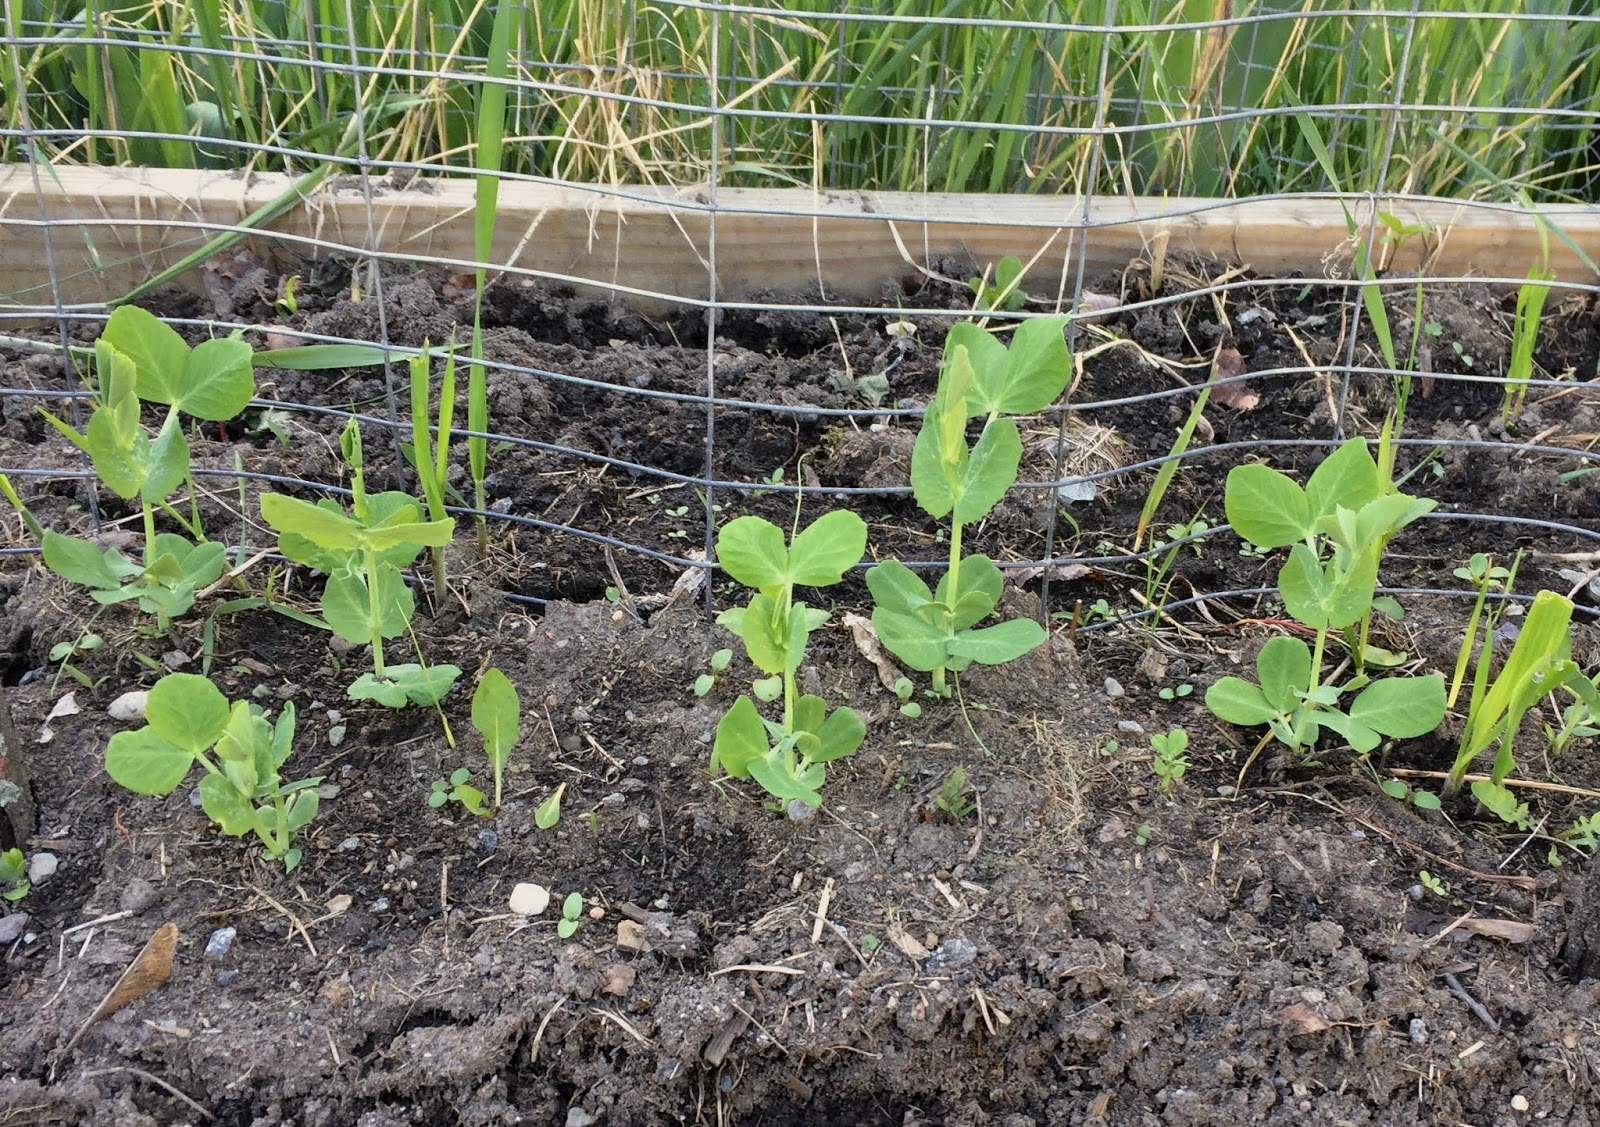
Sugar snap peas - still catching up from a cool May
The peas I planted April 8 when the soil temperature registered a promising 47°F  and with an all too   optimistic forecast of continuing warmer seasonal temperatures finally  emerged on May 3. Their germination  hesitation caused by almost 3+ weeks of very cool temperatures  with essentially no accrual of growing degrees. When the seeds did germinate  after several unusually hot days at mid-month, air temperatures promptly retreated and hovered  in the 40 - 50°F range. My  peas are just now deciding to catch up. The other cool weather plants that I set out  later in May to make room in  the cellar  for my happily growing tomatoes and cucumbers  also persevered and are finally  now  starting  to  show signs of responding positively to being in the great outdoors. On the plus side for this spring's weather is that both weeds and insect pests seem also to be emerging late.

So much for last month, now moving on to June...


    Rhubarb, a vegetable that used in pies goes well with vanilla ice cream.
  • If you're luckier than me and happen to live in a warmer nook of Rensselaer County, you might be harvesting spinach, lettuce and radishes by now. So far, I am just limited to relishing my rhubarb and horseradish...
  • Assuming you may have already planted some bush beans, beets, and squash at the end of May, you should think about follow on plantings of the same.  If you've just planted these fellas, wait another 10 - 12 days, then plant more. It's almost guaranteed, that whenever you sow seed or set out plants that   bumper crops will be ready for picking back home  on the third day of your long awaited get away to Nantucket... Don't worry about it. Be generous and ask a neighbor or friend to enjoy your harvest and maybe also to water your garden too as part of the deal...
  • Early June is also the time to set out the full complement of  warm weather veggies: basil, tomatoes, eggplant, cucumbers, peppers etc. for harvesting  later in August and September. Thanks to less disciplined gardeners than ourselves,  big box stores and nurseries might be sold out of these plants by early June, but local farmer markets will probably continue to offer a wide variety stock - and probably better acclimated stock.  
  • The next suggestion might seem slightly depressing, but later this month is also  time to start seedlings for late summer or autumnal   bounty.  Pick your favorite cabbage family member - cabbage, broccoli, kale etc. and get started.  
  • Follow on plantings of lettuce, however,  are a special case. Start mid-summer varieties such as Starfire (a green leaf),  Sparx (a Romaine heart)  or Adriana (a green butterhead) now. These can probably be sown   directly in the garden because it's still (hopefully) not too hot.  For late season lettuces  such as Miro (a green butterhead), Skyphos (a red butterhead) or Green First (a green Romain) you need to wait until mid or late July and start them indoors where it's hopefully cooler.  The heat tolerance of lettuce is relative.  The mid and late season varieties are a little less likely to bolt as quickly as early season types, but no lettuce really likes summer. For these follow on plantings you may need to provide a sun screen if you don't have a partially shaded garden area for them.  Direct seeding of lettuce during July and August is frequently not successful because the seeds  respond to high soil temperatures by going dormant for the rest of the season.
  • On an even more  depressing note, the next topic is WEEDS...  Where to start? By June many weeds are already well underway.  For gardeners with only a couple of small raised beds, weeds are no big deal - although for all gardeners they are like proverbial dragon's teeth  poping up overnight every night.  Mulching,  fabric cloth, and hand tilling  probably effectively   manages them for most of us.  Controlling weeds organically in larger gardens and in field environments  is more challenging due to scale - just ask any grower at your local farmer's market on Saturday. For those gardeners wanting to know what weeds they are pulling and wishing to expand their garden libraries, books identifying weeds are as multitudinous as weeds!  For our neck of the woods, Weeds of the Northeast (1997) is the classic and still remains in print from Cornell University Press.  Of course, a Google search using the phrase, "weed identification pictures" probably serves the ID purposes of most gardeners.  And for those few gardeners  who may want to pretend to be botanists, a source  providing a botanical approach to weed identification is  Weed Identification Tools and Techniques from Virginia's Extension Service. This doesn't tell you what your weed is, but instructs you how to analyze your mystery plant like a pro.  If you still remain stymied, send a photo via email or  bring a specimen of the plant to your county Extension  office for identification.  As a final note about weeds, perhaps the ultimate solution is to eat them.  For an interesting list of what's edible beyond dandelions, purslane and (maybe) garlic mustard, checkout the  Edible Wild Food site. 


And remember...

"Weeds are flowers too, once you get to know them." - A. A. Milne

What the world needs now

What the World Needs Now? Compost, Sweet Compost


Compost is decomposed organic matter from plant or animal sources.  It’s the stuff of magic, both loosening the soil and increasing drainage while simultaneously increasing water retention.  It feeds micro-organisms – those billions of fungi, bacteria, and unknown critters found in each teaspoon of soil – as well as provides nutrients to plants.  Most soils are severely deficient in organic matter.  While Dionne Warwick reminded us the world needs love, sweet love, more organic matter wouldn’t hurt, either.

How can you find good compost?  Unfortunately, there are no mandatory standards in place to help us.  Bagged materials may be labeled as cow manure or yard waste (dead leaves, lawn clippings, etc.), but indicating the parent material on the label is not required.  Often, packaged composts contain human biosolids – a nice way to say sludge – from a waste treatment plant.  While most of these products are probably okay for landscape use (excluding food crops), with so little information, their use is a crap shoot.


I like local sources of compost.  Take a trip to the pile and have a gander and sniff before requesting five yards be dumped in your driveway.  Compost should be largely free of debris, including trash, glass, rocks, twigs, wood chips and plastic.  It should have a dark brown color with a pleasant, earthy aroma.  If it’s too stinky, it either isn’t finished (and may harm your plants) or something has gone terribly wrong.  For some reason, many folks believe that compost is acidic and requires lime, while in reality most finished compost is near neutral and requires no adjustment.  And the poop on parent material is that if it is still identifiable, the compost isn’t properly aged.  Horse muffins or cow pies are fine, they just need more time to mellow. 


The best compost, like the best spaghetti sauce, is made at home, and the two share some similarities.  To the compost pile you can add the things at hand:  dead leaves, grass clippings, weeds (those without seeds), various trimmings, vegetable scraps, egg shells, coffee grounds.  Keep out meat, bones, grease and pet doo due to concerns with attracting pests and promoting diseases.  The pile should be roughly 3 feet tall, high and wide, although you can go up to five feet.  Put it somewhere secluded and give it time, as most home compost piles are cold and take years to decompose.  Eventually, you’ll find “black gold” at the bottom, ready-to-use.  Don’t ask for my gravy recipe – I compost much better than cook.   


David Chinery is the Senior Resource Educator for Horticulture & Turf Management for Rensselaer County Cooperative Extension.


PLANT PHENOLOGY & GROWING DEGREE DAYS   


In previous  posts we've discussed the importance of soil temperature for seed germination and have only briefly mentioned  the importance of air temperature as the furnace fueling plant growth.  Now, we'll spend  a little  time discussing why farmers (and probably only a few gardeners) are  interested, or should be interested,  in  closely tracking  the heating effects of daily air temperatures.

For most backyard gardeners just checking the planting directions on the back of a seed packet and noting that their favorite veggie matures in 67, 75 or 104 days probably fills the bill. Seed packet information usually summarizes how long a plant will take to develop within a region's growing season assuming average temperatures and moisture levels.  But plants do not, of course, develop at  constant rates after their emergence from the soil.

Source: intechopen.com
Their growth, photosynthesis, transpiration and enzymic activities - all occur at different rates given daily temperatures and lighting conditions,  but the growth of a plant's shoots, stems and leaves is mainly what we notice.  The chart to the right shows these differences in a plant's activities with respect to temperature. Although the temperature scale is not noted on the x-axis, the scale on the left side most likely starts at 50°F (below which most vegetables do nothing) and goes up to the high 90s°F on the far right side (when their activities mostly cease).

A plant's growth is  obviously sequential: a seed germinates, then the first  cotyledons appear, followed by the first true leaves,  then more leaves, budding, flowering etc.  Each of these stages only develops after a certain amount of heat has been received by the plant.  By tracking how much daily warmth has accumulated after planting a crop and monitoring weather forecasts, a farmer can  fairly accurately predict how quickly  a crop is developing.  This is important not just for predicting when to reap the harvest, but also for  knowing when to fertilize or when not to apply an insecticide etc. In fact, for farmers, the monitoring of Growing Degree Days (DDs) to anticipate when pests are going to show up is probably more important than knowing when their crop is going to develop its 3rd set of real  leaves.


Wonkish Break #1:  The identification and study of the stages of  plant life are part of phenology, the study of cyclical plant and animal activity in response to  weather and climate.  Other examples include bird migrations, insect hatching and the appearance of certain diseases.  The phenological stages of many agricultural field crops (including cut flowers) are frequently identified using the BBCH-scale (Biologische Bundesansalt, Bundessotmenamt und CHemische Industrie). This scale was developed about 70 years ago by four Germain chemical companies to provide farmers with better guidance relating to the application of fertilizers and pesticides. It's not the only developmental  classification system, but it is evolving into the most widely used. The BBCH-scale  provides  a common way to refer to plant development for both research and crop management. 


 Sweet Corn.  Source: publicdomainimage.net
In addition to phenological scales for crops, many scales have also been developed for both   beneficial and pest insects,  the emergence of unwanted plants, i.e. weeds, and even plant diseases.  These data  can be quite detailed  as  a chart for a tomato available from Wikipedia shows, but farmers don't need to track  every stage. They  just need to determine the key developmental stages for their  crops or to know when their favorite pest will appear.

And regarding pests, Cornell's website, Network for Environment and Weather Applications,  offers data on pest forecasts, DDs in general, and crop management along with detailed  pest forecast models specifically  for   sweet corn, tomatoes, apples and grapes.  Another resource from the same website, and a favorite of mine, is the Soil Temperature Map which provides temperatures at a depth of 2" across New England and the Atlantic Region states.  This is useful if you want to gamble on getting a head start on the season and are looking for validation of your soil temperature readings.


Sweet Corn. Source: Ohio State U. Small Farms
The  chart to the right  from Oregon State University's Small Farms website  for  sweet corn  clearly shows how the the crop's development varied in  different growing seasons because  the DDs needed for each stage accrued at different rates.

The Oregon SU chart provides any farmer with information about when sweet corn will be at a given stage by tracking DDs, but farmers need to track Growing Degree Days for their current year in order to manage their crops effectively. They can do this either by tracking daily temperatures themselves or by obtaining data from other sources.  The challenge  is to get current local data because temperatures vary within a region or even from field to field. Some Cooperative Extensions, including Cornell,  attempt to do this by offering data from a network of  weather stations and letting growers choose which station's data to use.


Wonkish Break #2:   What is a Growing Degree Day (DD)? It's just a practical way to count the amount of daily solar heating without dealing with any actual physics.  There are at least six  formulas for calculating DDs. Each one attempts to accommodate temperature fluctuations within a given day. The most popular one, shown on the left,  is referred to as either  the "simple average" or "single sine" formula. The Max  and Min Temps for a day are added together, divided  by 2 and then the Base Temp (the minimum temperature needed for  plant growth) is subtracted.  The result is a number that represents  a day's heating factor.  By adding these daily heating factors together  and comparing it with the plant's  phenological profile  matched with DD data, growers can predict within a couple of days when a crop will reach its next stage.  


Cornell University's Climate Smart Farming website provides  New York farmers with local DD data. Among the online tools available from the website is a  Growing Degree Day Calculator. By locating your property on its "Change Location" map  and entering a crop's planting date, the calculator will show you how DDs have accrued since your planting date as well as with  a 6 day forecast.   Two other useful tools available from this website include a Water Deficit Calculator and a Cover Crop Tool for Vegetable Growers. Of a more speculative bent, you can also get a projection for the outlook of the  entire current growing season.

Managers of commercial greenhouses, where  growing environments are carefully regulated, actually can  target particular dates for budding, flowering, fruiting etc.  Farmers in the real world outside of the greenhouse, of course,   control  fewer  environmental factors; but it enables those growing large field crops, grapes or  tree fruits and nuts to keep track of crop development in the farthest back-forty. Until recently phenological charts for vegetables and accompanying  DD data have been hard to obtain. This is starting to change as the Oregon and Ohio Cooperative Extensions' websites indicate,  but persistent Internet digging  is required to find DD data for many vegetables.  Vegetable growers, it seems, need to be ready to develop their own phenological charts and match it to DDs in order to make more extensive use of this technique. [This can be fun for those of us with obsessions about vegetables.] A good place to locate at least BBCH-scales for some vegetables is  Oregon State's  Croptime - Growth Stage Guide.  Charts combining developmental stages and DDs focussed on pest emergence and diseases are  readily available.  

And remember...

"Curiosity is more important than knowledge." - Albert Einstein


Raised Bed Revival


My first gardening challenge this year has been a big one:  re-build two raised beds.  I have a total of nine raised beds, scattered about our 1.3 acres in the few sunny spots available, since they are primarily vegetable gardens.  The one needing help, a sixteen footer next to the greenhouse, started out four feet wide, but as its hemlock sides rotted, it splayed out to over five.  While the plants don’t care, it looks awfully untidy, so re-building this bed has been on my seemingly bottomless bucket list for some time.


I’m a huge advocate of the many advantages of raised bed gardening.  Raised beds eliminate space-wasting paths between rows.  Not walking on the bed minimizes the back-breaking job of turning the soil.  You’ll also need less compost or fertilizer to make the root zone a happier place to grow.  Raised beds encourage the use of trellises for rambling crops like cucumbers and tomatoes, which keeps the area neat.  My old in-ground vegetable garden resembled a lost corner of the Amazon by August, so the inherent tidiness with beds is a tremendous benefit.  You can plant closer in raised beds, too, so less space is wasted (think “Square Foot Gardening,” created by 1980’s green guru Mel Bartholomew).  Closer planting means less area to weed, and if you mulch (and you really should), less mulch is needed. 


Of course, every upside has a downfall, and it’s my duty as an Extension Educator to give you both sides of the rutabaga here.  Eventually, wooden raised beds need to be replaced.  Starting with my first ones built in 2002, I have used hemlock lumber from local sawmills.  This material is reasonably priced, locally-grown and additive free.  In my experience, however, it has a life of about ten to twelve years, after which natural decay takes over and the sides of the bed fail.  Initially, I didn’t mind re-constructing them, but I’m at the age where I want something more durable.  I’m now using the newest generation treated wood, which contains no chromium or arsenic, chemical constituents in the old treated lumber which made it taboo for vegetable gardening.  Recycled plastic lumber, bricks, blocks – fancy and store-bought to found or scrounged, many materials can be made to work.  Necessity makes strange beds, fellows. 


Experience has taught me to adopt other raised bed upgrades.  Due to the wild ways of wildlife, I’ve deemed the installation of ½ inch galvanized steel hardware cloth on the entire bottom of all raised beds mandatory.  Moles, consummate diggers, construct terrestrial runways invaded by voles, vegetable eaters, and this duo has steadily made growing any unprotected root crops at my place pointless.  With the steel mesh screening the critters from below, I can grow dahlias, onions and even delectable potatoes in peace.  Additionally, the longest raised beds are now only eight feet, with reinforced corner blocks and plenty of deck screws to prevent the sides from gradually flopping.  If I added heated soil and solar-powered LEDs, I could probably grow year-round.   

David Chinery is the horticulture educator at Cornell Cooperative Extension of Rensselaer County

CONTROLLING & SUBDUING TOMATOES in the GARDEN


New Gardener Surprised by Unruly Vines


Feral tomato escaping its cage,
Source: scientificgardener.blogspot.com
Recently I spoke with a new backyard gardener who mentioned to  me that last year his tomatoes  had gone wild  even after he had put them in cages. The vines  got "tangly" and had refused to stay in their cages. Had his tomatoes really gone feral?  

Experienced tomato gardeners, of course, know there are two kinds of tomatoes: determinate and indeterminate. Determinate plants, e.g. Valley Girl, Defiant and Celebrity, typically grow to a height of around 3 - 4 feet, blossom and then all their fruit   ripens within  the space of 1 - 2 weeks.  Indeterminate plants, e.g. Beefsteak, Big Boy and most Heirloom varieties,  can grow  numerous vines from suckers that also turn  into vines of 6 - 12 feet or more. Both types can benefit from pruning; and for most of us with limited garden space, some additional  kind of vine management is also required.  Without gardener intervention neither type will look like the neat and tidy tomatoes you see in most Internet  or seed catalog pictures.

Now in fairness to those of contrary opinion, I acknowledge  there are gardeners who claim that except for removing the lateral shoots from the bottom 10" of any tomato to promote better air circulation, pruning is not necessary. And, I also admit I never  pruned any tomato growing in my uncle's fields when I was younger,  but my uncle had a lot of space and a lot tomatoes and we just let them sprawl on the ground. We lost some tomatoes to slugs and to our clumsy footwork, but we were satisfied with our yields for market.

The arguments in favor of some kind of pruning include that it increases the size of individual fruits by reducing the energy and nutrients otherwise devoted to plant growth,  allows for more exposure to sunlight   further minimizing the risk of disease from too much dampness, and finally pruning  simply fits the plant(s) to limited garden space.  However, pruning  implies that you also   do employ some kind of vine support. Keeping the fruit off the ground also decreases fruit loss from disease and damage from slugs and, maybe most importantly, avert some backaches later during harvest.

Cages & Staking for Determinates


Cages sometimes need to be staked to hold the fruit load.
Source: oldworldgardenfarms.com
By their nature, determinate tomatoes need less pruning to fit garden space then indeterminate varieties. The Internet is loaded with tomato pictures exhibiting various gardener techniques:  single and multi-stick staking, inverted and pyramidal cages, simple vertical fences and all kinds of trellises.   My experience with Celebrity tomatoes  is that cages generally need staking because heavy  fruit loads require that cages may also  need propping  up    even when I have limited plants to 4 shoots.  I also space the plants at 3 - 4  feet  intervals instead of the commonly stated 2 feet for determinate tomatoes because I like to be able to move around my plants easily as well as  to enable good air flow.


Dealing with Indeterminate Varieties


As we mentioned earlier, indeterminate tomatoes can produce long vines, and the vines will keep on growing and  trying to set new fruit until killed by frost.  Towards the end of a growing season it's a good idea to  clip off  vine leaders to stymie new growth and encourage   the plant to focus its energy on existing fruit development.  Because indeterminate vines can easily exceed 12 feet (20+ ft is not an uncommon length in green houses if a grower has pruned a plant to a single vine), it is necessary to provide a way to support (actually, suspend) the vine.  Cages are not a good choice for indeterminates. The cages available from many big box and retail nurseries, even the large economy size cages, are simply too small in my opinion, and way too expensive.

Wow! Overhead trellis for a single tomato plant.
Source: mothernaturenetwork.com
If you trim  intermediate vines just to fit your cages, the yield will be greatly reduced; if you don't prune, the vines will continue to grow and either cascade down to the ground or land on an adjacent cage - soon creating a tomato vine jungle.    Staking is also possible, but requires you to make or locate stakes long enough to hold long vines. With stakes you can control vine spacing better; otherwise they really offer little advantage over  cages.

That said,  some kind of trellising or fencing seems to be  better approach. Trellising also allows your imagination to get some exercise in design.  A trellis can be as simple as growing a tomato along a fence (assuming you don't need to worry about    either  wild critters or neighbors, both of whom probably like tomatoes).   Or,  a trellis can be a simple A-frame design with its cross pieces lashed  together for a season.  A-frame trellises are  popular in small gardens because they are quite stable, but  reaching some areas might not always be easy.

Simple A-frame trellis.
Source: freescortpost.com
I think  a simple vertical frame (below right) is better. It requires less material and less space. You can also reach both sides easily. The major drawback of  a vertical design, however, is that the posts need to be firmly set because they will be exposed to  dynamic loading: vines + fruit multiplied by wind.

For either an A-frame  or a vertical design you have choices about what to use and how to attach  cross pieces. In either approach you can use  cord, netting, wire cable or even sections of fencing   attached to the supporting frames to bridge the openings between posts. Another variation, if you choose to prune to a single stem, is to simply attach a top cross piece between posts and suspend  single strands from it for  vines.  The strands must be  firmly secured at the bottom to keep the vines from blowing in the wind.
Simple vertical trellis.

Source: tomatoville.com


Last Words about Pruning 


For determinate tomatoes in cages I usually try to limit a plant to 4 stems, but I do sometimes break my rule and go with 5 because I leave more  space than is commonly suggested;  and because I tend to have more tomatoes than I have cages, I keep a supply of stakes anyway. But that's pretty much all I do. Remember, the stems of these guys only grow to a set height and a set number of fruit.  By removing their side stems you are restricting how many tomatoes the plant will produce.  

Add caption
The indeterminate type, as already mentioned, are a different story. They will keep on growing and trying to start new vines.  These start out as "suckers" (see diagram below) at a node just above a  leaf stem.  When you are growing this type of tomato, your


trellis or frame decision will determine what your pruning approach will be.  Allowing for 4 - 6 suckers   to develop  into vines is common.  But if you think your growing season is long and only have a couple of plants, then you   might think about letting a couple  more lateral vines develop.

For commercial growers using support systems in either greenhouses, high tunnels or   the field, a 4 vine approach seems  to be considered the golden mean in that it balances  a profitable yield against  the labor costs involved in  attaching additional  vines to frames and  regularly pruning the to remove  their own  new suckers.


And remember...

"A good garden may have some weeds." - Thomas Fuller (1608 - 1661)


VEGETABLE VARIETIES FOR GARDENERS (VVfG)

  
VVfG is a citizen science project developed  by Cornell University's Cooperative Extension 
to collect and share data about growing vegetables in New York State.
------------------------------------------------------------------------------------------------------

Last Year's Experience: Lettuce, Tomatoes & Basil


Last year my Master Gardener companions, Mimsy Pye, Marge Davey and I, experimented with Bed Number 1.  The Spring Plantings consisted of 3 varieties of leaf lettuces: Buttercrunch, Black Seeded Simpson, and Blade.  Because it was mid–May before we were able to plant the rows, we decided to put them along the outer edges of the 4ft by 4ft bed leaving room for the summer crop of tomatoes and basil in the bed's center.  

It was interesting to compare the 3 varieties --  all planted at the same time and all growing under the same conditions.  The ‘Black Seeded Simpson’ by far out-performed the other 2 as far as yields.  However, it really did not have much flavor.  If you prefer the taste of your salad dressing, then this was the one for you.  ‘Buttercrunch’ had a mild buttery taste, with the best texture, forming more of a rosette type loose head. Dark red ‘Blade’ had a poorer germination rate, but was the most flavorful.  Red colored lettuces have more antioxidants and micronutrients than just plain green ones.   As it matured it did have a little more of a bitter flavor, but not as much as an escarole or radicchio.

I think that it is worth noting that caring for these lettuces would have been different if they were in my home garden.  At home, one can easily check their garden every day or two, even with a busy schedule. The Demonstration Garden was not as convenient.   Thinning should be done on a regular basis, so that you have the benefits of nice tender baby lettuces, making room for the other plants to spread.  Too many plants together get leggy, with some leaves getting slimy.   

Jasper on left responded to warming weather faster than the Brandywine on right.
With the lettuces still growing, we planted a ‘Jasper’ cherry tomato and a ‘Brandywine’ heirloom tomato, as well as ‘Genovese’ and ‘Thai Sweet’ basil at the end of May. Last year’s spring in our neck of the woods was wet and cool.  This was good for the lettuces, but not the tomatoes and basil.  As the weather finally warmed, the tomatoes responded.  

The contrast between the two plants was quickly evident.  The heirloom ‘Brandywine’ struggled to overcome the wet, cool spring.  It quickly developed early blight and remained somewhat stunted.  It produced very few fruits, with the earlier ones having little flavor.  The last one picked in a gloriously warm October was large and fabulous. It was so sweet and juicy with a deep rich tomato flavor.


  ‘Jasper’, an indeterminate new hybrid variety, outpaced the heirloom.  ‘Jasper’s’ disease resistance includes Early Blight, Septoria leaf spot, Fusarium wilt and Late Blight.  The plant quickly outgrew its 5 ft stakes by a good 2 ft.  It was covered with clusters of ¾ inch round, red fruits.  The taste was flavorful and sweet, but not quite as sweet as ‘Sungold’.  Harvesting at first was a little tricky.  Trying to pick the individual fruits caused them to split, making it easy to pop into your mouth, but hard to donate.  Snipping off the whole cluster kept them beautifully intact, and they kept quite well for a few days.  Like most cherry tomatoes, one plant is all you really need.


The two basils struggled with the cool, wet conditions as well.  A few days of high temperatures in late spring caused them to go to seed.  Even with pruning, the ‘Thai Sweet’ never really recovered and had poor yields.  The “Genovese” did better, but it later became shaded by the ‘Jasper’, which also impacted its yields.  Frequent pruning can extend a basil plant’s life, but at some point it will get leggy and just keep producing flowers.  Again, a home gardener would constantly be doing this, adding the trimmings to some delicious dish. Once cut delicate herbs like basil don’t travel well, making them difficult to donate.  

Pskem River garlic, early spring 2018.
Cornell also called for a fall planting of  ‘Pskem River’ garlic but which they did not provide.  ‘Pskem River’ is a hard necked variety from Uzbekistan.  It has large purplish cloves, maybe 3-5 cloves per bulb.  It is supposed to have a strong flavor and grow well in our area.  I waited too long to buy it on line and it was sold out. However, I was delighted to find it at my local food co-op. 

After cleaning up the tomatoes and basil in mid-October, the soil was prepped and along with a dusting of bone meal, the large bulbs were pressed into the soft earth.  I am happy to report that they made it beautifully through the winter, even though they were not mulched. 
(More on garlic in a later post.) 


 So, that was last year’s experiment.  I can’t wait to see what this growing season will bring.


Text and photos submitted by Nancy Scott, Rensselaer County Master Gardener

BLUEBERRIES NEED ACIDIC SOIL


Root Concerns is a gardening newsletter produced by the Cornell Cooperative Extensions of Rensselaer, Albany, and Schenectady Counties. Because its contents have not been previously indexed by Internet search engines, relevant articles from past issues will be occasionally reprinted.

--------------------------------------------------------------------------------------------------------------------------------------------

Root Concerns  -  July, 2012  Volume 6 Number 6   Page 1

It’s the gardener’s job to meet the plant’s terms, and blueberry plants make it clear that they will not be taken for granted. Countless times, the gardener has the blueberry plants on order, in the car’s backseat, or waiting un- potted next to a hole, when he vaguely remembers he should be concerned about the soil. Ah yes, the pH needs to be low for blueberries, right? When the test shows a 6.2, trouble arises, since the plant demands a 4.5. It seems perverse that a sweet berry should come from such sour soil, but there you have it. The gardener can add sulfur to acidify, but sulfur takes months to work. 

Source: UMN Extension
Meanwhile, the blueberry plants can’t stay in the backseat, so the gardener plants them anyway. Then those healthy blueberry plants become stunted. The leaves yellow. Instead of getting larger each year, they actually diminish, akin to a modern investment portfolio. Then one spring, they silently reach the point of no return.  It may be a tart lesson, but if one is to have blueberries, one must pay attention to the soil. Don’t be lulled into thinking that all the Hudson Valley has acidic soil, and since blueberries grow just fine in Grafton, they’ll thrive in your backyard, too. Take it from an old soil tester (me), soil pH varies wildly from place to place in these parts, and while much of it is below 7.0 and technically is acidic, it just isn’t acidic enough for Vaccinium corymbosum. Have a pH test done today, add your sulfur tomorrow, and re-test in six months. Only when the pH is in the range of a lowly 5.0 should plants be ordered or purchased. Should you be a successful as a blueberry farmer, you’ll have other things to worry about, especially the birds, who are looking forward to the crop as much as you. But that can all be worked out with netting or the construction of giant chicken-wire enclosures, if you’ve got the right soil.

But here is the good news: today, at least we know what blueberry plants want. A century ago, people loved eating wild blueberries, but plants taken from the woods and put into cultivation failed to thrive. No one had the foggiest idea why until a U.S. government botanist named Frederick Coville unlocked the secret. A Cornell graduate, the perceptive, curious outdoorsman explored Death Valley, helped found the National Arboretum, and published 170 books and papers about plants during his lifetime. All very notable achievements, but to a lover of blueberry pies, muffins and ice cream, I’m awfully glad that in about 1910, he discovered that blueberries required acidic soil.

The following year, Elizabeth White, a cranberry-baron’s daughter, read his work and sent men through the New Jersey Pine Barrens searching for the choicest blueberry plants. These were propagated, cultivars selected, the soil amended, and the first commercial crop was picked in 1916. With a little knowledge, sweat and planning, we can grow our own in the backyard, too.

Text by David Chinery, Rensselaer County Extension