Plant Nutrition : Macronutrients 


While we wait for the snow to melt and our gardens to dry out, let's review what plants need and   what fertilizers provide.   Also, if you haven't had your garden soil recently tested and think your vegetables are not up to snuff, we'll identify some of the major "aha" nutritional deficiencies you can look for....   You'll just have to try to remember all this once the growing season starts...

----------------------------------------------------------------------------------------------------------------------


Every bear in the woods probably knows that plants use the three elements, Hydrogen, Oxygen and Carbon. Plants obtain these three  from  air and water.  But there are 14 other elements that are vital for plant nutrition. Of these, six are identified as "macronutrients" with the remaining 8 elements characterized as "micronutrients" or "trace elements."  Plants actually use other elements as well, but these 14 are needed by all plants. We'll cover micronutrients later  in  a separate post. 

Macronutrients


 Lack of Ca. Source: Cornell Extension

Calcium (Ca)  - Calcium is generally available in soils and is taken into plants through evapotranspiration (water siphoning from the roots through the leaves to the atmosphere). It is the key ingredient  in plant  cell walls. During times of drought (and/or a gardener's under watering) or high humidity, plants do not move enough water through their tissues to supply cell needs resulting  in calcium deficiency.  This is important to note because calcium may not necessarily be deficient in the soil. In either case, this deficiency dramatically manifests itself in tomatoes and peppers, for example,  as blossom end rot. An over abundance of calcium is more subtle to detect because  too much calcium can interfere with the take up of other elements whose deficiencies may exhibit markedly different symptoms.


Chlorosis.  Source: Cornell Extension


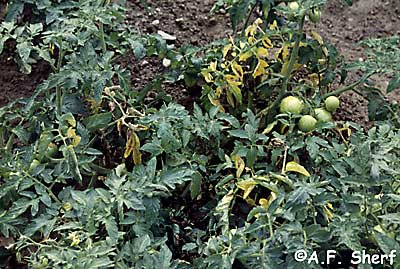
Magnesium (Mg)  - Also typically available in soils, especially in clays.  It is incorporated into chlorophyll and plant enzymes.  Its deficiency appears initially as raised areas of  light yellow in mature leaves.  Later, these areas become more pronounce and eventually turn into dead leaf areas (chlorosis). 


Nitrogen (N)   - Nitrogen is utilized by plants in several forms,  but let's skip  over the complex chemistry of the Nitrogen Cycle and just say  that  plants  absorb  these  compounds  incorporating  much of it into   their leaves and the enzymes essential for photosynthesis.  A deficiency will first appear as a paling of mature leaves, then evolve to  yellowing before ending in chlorosis (dead leaves).  Although  nitrogen is essential for plant growth, too much will also cause chlorosis in leaves.  

[n.b. Fertilizers meant for house plants  are typically loaded with nitrogen; and if you use them on vegetables, you will get lots of vegetative growth and less fruit.]


Excess Phosphorus.  Source: U Maryland Extension
Phosphorus (P)   - Phosphorus is used in cell membranes and serves as the primary carrier of energy throughout plant cells.  It is incorporated into DNA and RNA as well as  regulating enzyme activity. It generally occurs naturally in soils, but its availability to plants depends upon soil pH.  A deficiency shows up as dark green or  purplish tints in tomato leaves. Eventually, flowers and fruit do not develop.


Potassium deficiency.  Source: Yara.us 


Potassium (K)   - Plants need potassium almost as much as they   need nitrogen, and   potassium also abets nitrogen take up. It maintains various metabolic activities by regulating water within the plant. Potassium deficiency may first appear as yellowing of older leaves before they turn brown. (This may also be called leaf scorch or leaf burn, but other conditions such as exposure to salts, insecticides or too much fertilizer might also cause it.)   The taste and appearance of fruit can also be affected.  


Sulfur deficiency.  Source: haifa-group.com
Sulfur (S)  - Sulfur is utilized in amino acids, proteins, vitamins  and other compounds, e.g. sulfur gives onions and mustard their distinct flavors.  Although sulfur also occurs naturally in some soils, its concentration is relatively low compared with other nutrients and  tends to be  especially low  in sandy soils. Much of the sulphur that is found in soils derives  from the decomposition of  organic materials, e.g. compost.  [This is another  good reason for you to start composting.] A very small amount of  sulphur can also  come from the atmosphere.  Its deficiency appears as yellowing of younger leaves and woody looking stems.


Nutrients and Fertilizers

From what I have observed of neighbors and friends who  try  container gardening, nutrient deficiencies  can show up  relatively quickly because the gardeners do not replenish  the soils from year to year, fail to fertilize during the growing season and/or do not maintain adequate moisture levels. For gardeners, like me, who dig up their front or backyards, deficiencies may take many growing seasons to appear because we are accessing  a greater reservoir of nutrients. Maintaining a consistent moisture level (apart from timely cultivating) is probably our major challenge!

Soils typically have all of the above macronutrients to some extent because these elements  originate from mineralogical sources. However, large percentages of these elements  frequently  are chemically bonded with other compounds in the soil  and rendered  unavailable to plants.  Over time  the usable forms of these  elements   decline as  crops are harvested, remaining plant stock  removed (i.e. diseased plants pulled up and stuffed into lawn bags), leached or washed away by rains etc. Adding compost, natural or synthetic fertilizers replenishes these otherwise lost nutrients.

When backyard gardeners talk about fertilizers, they  are mainly referring to  commercial balanced fertilizers that supply N-P-K (Nitrogen, Phosphorus and Potassium), three key nutrients of the macronutrient group. The concentration of these elements is typically cited as percentages of package weight, e.g. 5-10-5, 10-10-10. The amounts of other macronutrients may or may not be mentioned, and micronutrients hardly ever. The N-P-K combo get the spotlight because they are significant in foliar, root and fruit development; but, as hopefully discernible  from the above text, they are not the whole story.

Fresh & Mature Compost.  Source: permaculturenews.org
Commercially produced fertilizers offer the advantage that they tell you the amounts of some or all of the macronutrients you are getting as opposed to what you sprinkle on your garden from your compost pile. Nutrient specific fertilizers also are available to address  specific soil needs, e.g. sodium nitrate or superphosphate, that might have been identified from a soil test.  Commercial fertilizers derived from organic sources, e.g. those containing bone meal, fish meal,   vegetative compost, manure etc.,  will include more nutrients and also be sterile. The best summary about  the types fertilizers available, I have found, is this one from the Weekend Garden Net.   Scroll past the self-test and look are the chart.

Putting your compost on your garden and mulching does a lot to maintain nutrient levels, especially micronutrients; and if you do not observe any plant problems, keep doing it. Just be aware that our backyard compost piles typically show a N-P-K ratio of around 1-.5-1.  Although you might come to think that plants need a 7 course fertilizing banquet, in reality they make do with very little.  For example, if you want to apply a liquid fertilizer to your vegetable garden, Cornell suggests the following ratio of a dry fertilizer (15-15-15) to water: 1 1/4 ounces of dry fertilizer to 2 1/2 gallons of water. This concentration provides a nutrient drink of only a couple of hundred parts per million!   If you were going to use this concoction for seedlings, cut it down to about 1/8 of a teaspoon. [And, REMEMBER: it is always better to use less fertilizer than too much and do not put either dry or liquid fertilizers directly on plants.] To get better guidance about using fertilizers in your garden, see the Monroe County Extension's publication,  Soil Preparation and Fertilizers for the Home Flower and Vegetable Garden.


"If the grass on the other side of the fence appears greener... it must be all the fertilizer they are using." -  Kevin Rodowicz, MD


MARCH - GARDEN PREPARATIONS

As promised, here is the next installment, or harangue, about what you should be doing now that March is underway, and your having survived dismal February.  Garden soils are probably still wet, cold and maybe some are even snow covered; but, you can still... 
  • Prune those grape vines and fruit trees now; the same ones you probably postponed pruning last month... 
    Typical hand pruners
  • If you are worrying about your soil's pH value or its nutrient levels,  get your soil tested this month.   You still have time to start making amendments to the soil if needed.
  • If your garden is mulched,  you might consider  moving   the mulch off the rows in order to hasten soil warming, but  check the weather forecast to determine if predicted temperatures will be moderate. Remember, mulch insulates the soil from summer's heat and also from the warmth of spring's sun.
  • You can still start (maybe more?) cool weather vegetables such as cabbage, onion,  parsley, lettuce and beets now. Yes, beets, they do transplant well to the garden.
  • Continue to resist the temptation to start those tomatoes, peppers etc. UNLESS you  have grow lights and heat pads or have the perfect large sun room with plenty of space. Otherwise, your indoor seedings may look like those pictured below. Although eventually you could plant these sorry seedlings  in a shallow trench outdoors in late May to spur their root  development,  Cornell studies show that yields from "leggy" tomatoes are notably lower than from healthy plants.   

Source: thespruce.com

Unfortunately,  your window sill is far from being the ideal plant nursery because: A) windows in general do not admit enough light,  B) the days are still not long enough  to provide  8 hours of direct  light, and C) it's a long time until you can set those warm weather seedlings outside.  [n.b. For tomatoesCornell's School of Agriculture recommends waiting around 10 days to two weeks after the last frost and night temperatures stop going below 45°F to set out tomatoes.] 

I typically start my tomatoes in early April with a goal of moving them outside  after Memorial Day, or, at least, to begin hardening them off around Memorial day.  


  • If you don't have a cold frame, much less a greenhouse, start saving those 1 & 2 liter clear plastic bottles and 1/2 and 1 gallon milk jugs (these translucent jugs work, too).  If you do decide to rush the season, by cutting off the bottoms and removing the caps you can use these containers as little cloches to protect your sensitive seedlings when you abandon them outside.  For other ideas about extending your growing season, this  Cornell guide provides more ideas.

And remember, "Trees and plants always look like the people they live with, somehow." - Zora Neale Huston


Book Recommendation - WEEK-BY-WEEK VEGETABLE GARDENER'S HANDBOOK 

Looking for an  excellent week by week guide for planning, planting and harvesting your  vegetable garden. This book  is designed to work starting from the average date of the last frost in your neighborhood. Planning the vegetable garden starts from 20 weeks before that frost date and continues to harvest and beyond up to 29 weeks after that last  frost date with daily and weekly to-do lists.

The Handbook provides instruction for all tasks associated with the vegetable garden. The techniques work for large or small gardens. It also serves as a workbook where calendar dates for your specific environment are entered to help you stay on track. Space for note taking is also included. The book is sprinkled with hands on tips from soil preparation and seed starting to how to preserve your harvest.  


The authors, Ron Kujawski and daughter, Jennifer Kujawski, speak from hands on experience with a 6,000 square foot garden in The Berkshires. Jennifer is a horticulturist and a writer and editor who works for a variety of organizations. Ron is the author of the popular syndicated gardening column “The Gardener’s Checklist” and served as an Extension Educator for the University of Massachusetts for 25 years. He has also served as an advisor to the Berkshire Botanical Garden. You may find him there during the growing season doing weekly garden pest surveys.

The book is spiral bound so lays flat making entries easy. It is written with easily understood instructions and a pleasant sense of humor. It is available through independent bookstores and Amazon. The publisher is Storey Publishing (Pownal, Vt., 2011).


Submitted by Richard Demick, Master Gardener, Rensselaer County Cooperative Extension


TOPSOIL  & A  LITTLE COUNTY SOIL HISTORY 

Backyard gardeners think and talk about soil a lot, especially  topsoil... but that is only scratching the surface so to speak.  If you have bought a load of "topsoil" to start your garden,  that soil is probably very different, and hopefully better,  than  what you have in your backyard. But do you really know what you got?

There is no definition of topsoil that spells out what it has to be. Topsoil can be whatever someone scoops up from the earth's surface someplace, labels and sells it as topsoil.  It can be great for your vegetables, or it can be lacking in nutrients or its pH can be unsatisfactory.  If you are going to order a truckload of topsoil, at least ask about its pH value. The supplier should be able to tell you.  If the supplier does not know, then you know you need to think about getting a soil test.

The soil's pH is important because it affects  how readily  nutrients such as nitrogen, potassium, phosphorus and a few others  can be used by your plants. If you remember any high school chemistry, pH is measured on a logarithmic scale between 1.0 and 14.0. Soil pH values in the range of  between 6.2 - 7.2, basically  a neutral range, i.e. neither acidic or alkaline, are good for growing most vegetables.  But considering that it's still winter and you cannot yet dig in your garden, let's talk about  the character of soil in general and little bit about Rensselaer County's soils.
Source: CA Urban Forests Council 

The soil cross-section to the left shows its defining layers, called horizons, starting with a thin first layer of detritus (called the O horizon) and most easily recognizable  in forests as "the floor," followed by topsoil (the A horizon), then the  subsoil layer (the B horizon) and finally reaching bedrock (the C and R horizons).

The O horizon, when it is recognizable,  can be measured at most in  a couple of   inches, usually much less.  The topsoil layer, or A horizon, is where the organic and mineralogical  components mix along with air and water. It is  also where most  subsurface life exists, e.g. earthworms, grubs, bacteria, and roots. The A horizon frequently is between a few inches to about one feet in depth, but can be deeper.  The underlying subsoil layer, the B horizon,  may typically vary between a few feet to hundreds of feet in depth; and finally  the C and R horizons,  first  consisting of broken fragments and then solid bedrock that simply goes a long way down.

The mineralogical characteristics of topsoil originate from bedrock, the R horizon. Although the above cross section gives the impression that bedrock fragments gradually migrate upward over eons, the reality   might be better pictured  as fragments disintegrating from the weathering of bedrock outcroppings or volcanic flows (think  mountain peaks, plateaus, slopes etc.)  with water and wind providing the  common methods of soil redistribution to and accumulation in lower elevations.

Rensselaer County 


For Rensselaer County, its soils  came from glacial sources, tills, drumlins, outwashes etc.,  as the county  emerged from the last Ice Age starting about 13,000 years ago. In the western third of the county this glacial sediment covered over much of the earlier topography  with sand, gravel and clay creating outwash terraces that in some places reach depths of 200 plus feet.  Not so in the county's central area, the Rensselaer Plateau,  whose original surfaces were first closely scraped by glaciers and later left with relatively little sediment, but with  many boulders, by the receding glaciers. In the county's eastern-most region that is drained by the Little Hoosic River and its tributaries,  glacial sediment   accumulated also  in similar fashion to what happened on the western side of the county but the general slope of the land is more gradual. For gardeners interested in more information about county geography and soils, I recommend the 1988 U. S. Dept. of Agriculture's  Soil Survey of Rensselaer County Soil. It makes great reading if your just a little wonkish.

Now let's get back briefly to topsoil (the A horizon) for a wrap-up.  Remember that topsoil's organic material  must  accumulate over time before the soil can support much biodiversity.  That initial  accumulation may  start with some bacteria or a few pioneering plants whose seeds might have  been distributed by wind or perhaps birds; and after generations of these organisms, different species including animals can begin showing up.  A commonly cited figure  (and mayboptimistic for this region) is that an inch of topsoil   requires 300 - 500 years  to develop once an ecosystem is established. However, climate is the most important factor determining the rate of topsoil formation.  A few centuries probably does work for   warmer  environments.  For temperate climates like Rensselaer County's with its cold winters and elevation changes of almost 2,800 feet, an inch of topsoil might easily require 3,000 years or longer to develop.

So, whether you either are turning over your backyard's topsoil with a spade or buying topsoil by the bag and/or truckload, you are handling a natural resource that has taken  a very long time to develop and is beyond any  mere mortal's ability to replace.


BOOK RECOMMENDATION - KITCHEN GARDENING IN AMERICA

It's mid February and maybe dreary and cold.  Maybe it's time to curl up under a blanket with a book about vegetable gardening.  Here is an obscure little book, Kitchen Gardening in America: A History by David N. Tucker (Iowa State University Press, 1993).  You will probably have to ask your local public library to locate a copy for you through their wonderful interlibrary loan service. You can probably have a copy in your hands before spring.


Although gardening is certainly an ancient human activity, many of our practices today, like using raised beds and watering cans, stem from long established English gardening practices. When we see "kitchen gardens" at places such as the Farmer's Museum in Cooperstown, NY or the Plimoth Plantation in Plymouth, MA, we easily relate those gardens to our own backyard endeavors.

In reality, however, colonial gardens were typically much larger  taking  up between 1 - 2 acres and  were the primary source for  much of their food for the year. Women took the lead with help from young their children to plant, weed, harvest and save seed. Jefferson's 1 acre raised terrace was his "kitchen garden" at Monticello, VA and probably  better reflects colonial reality.  Jefferson's garden, I suspect, probably appeared better maintained than most colonial gardens given that he used slaves to do the work.

Until the early 19th century, gardeners mostly saved seeds from mature plants or traded seeds with neighbors. Seed merchants were far away and few in number.  As the population spread into interior regions from the East Coast,  some merchants did see business opportunity, but it was the Shakers who developed the paper seed packet and who first distributed display boxes in general stores.  Merchants received a  commission for the seeds sold, and the seed business took off...

If you like this book, other books that Tucker has  authored include The Mugwumps and The Decline of  Thrift in America. I haven't read them, but I like the titles.


VEGETABLE VARIETIES for GARDENS (VVfG) UPDATE - Soil Testing


At its recent February meeting the Rensselaer County Master Gardeners decided to test the soils in their vegetable planting beds. The beds have been used for a number of years with minimum fertilizer, but often mulched with shredded bark.  The gardeners will take samples from each of the 9 beds,  combine them into a single sample and send that sample for a complete analysis in March. If there are nutrients that need to be added or the soil pH level  needs adjustment, there  will be time to start those amendments in advance of the growing season because  soil adjustments can  require weeks to take effect.

Healthy soils, healthy plants

When is it necessary to have garden soil tested? 

If you are planning to grow more than just a  couple of tomatoes and a little lettuce, or if you only have a 4' x 4' raised bed and noticed lots of earthworms when you filled the bed, maybe you're okay.  On the other hand, here are a few reasons to test:  
  1. Do you have a new garden location? - In new housing developments, sometimes builders remove/replace top soil. In older homes, the backyard frequently was the spot where the excavated  subsoil from the foundation  was dumped, or it was where the coal ashes from an old furnace were used to fill a low spot.
  2. Have you been using the same garden plot for years and only adding  a sprinkle of 5-10-5 fertilizer from  a bag,  and your yields seem to be declining? You might have some micronutrient  deficiencies.
  3. Do the leaves on your plants seem smaller than normal, look pale or a little yellow? Do the underside of your tomato leaves have a purplish tint; or are the leaf edges brown and curled? The soil may be  in need of nitrogen, phosphorus or potassium.  
    Blossom End Rot Source: T.A. Zitter,
    Cornell University, Ithaca, NY
  4. If the soil is deficient in calcium,  your tomatoes will develop blossom end rot.
  5. Do your plants look green and bushy, but set little fruit?  Maybe you have excess nitrogen in the soil.
  6. For a longer list of symptoms, check  this  chart from the Arizona Extension Service, but realize that... 
Diagnosing nutrient deficiencies (or excesses) can be tricky, because many plant symptoms overlap; and there can be multiple  conditions needing attention.   The Rensselaer County Extension Service and the other area Extension Services offer both simple pH testing as well as more extensive soil analysis.  These services typically only cost a few dollars, and the results will be returned to you promptly along with advice on how to fix any problems.  But, it is really important to get the testing done early in the spring in order to start soil remedies.

VVTG is a public science effort coordinated by  Cornell Cooperative Extension  to collect and share the practical experiences of  Master Gardeners  maintaining demonstration vegetable gardens. 

February  Garden Preparations

Every garden blog seems obliged regularly to  "nag" its readers by posting lists about what they should be doing now, but probably have been ducking from doing.  Here's our list:
  1. Stop feeling down in February, cheer yourself up a little, go find those seed  catalogs that arrived in the mail immediately after Christmas, and look at them again. Their covers will remind you that spring might be coming sometime.  Do you remember what seeds you were thinking about ordering?  This time, jot down what you want to order. It's not too late for that.
  2. Get outside and breathe some cold air. Now is the time to prune those grape vines and fruit trees as well as a lot of other stuff.  In fact, I've almost motivated myself now to do the grape vines I maintain  in a nearby community garden.  If you're not sure about what to cut, checkout Cornell's fruit growing guide for the home gardener. It covers everything and probably more than you want to know about growing all kinds of fruit.
  3. I hate this one... Wash those flower pots, planting trays and the tools you use for starting your plants.  Remember to add some bleach to the water to kill the  mold or bacteria.  And, you might as well clear off the table or countertop that your going to use eventually to start seedings. If you happen to have a greenhouse, you probably need to clear off its decks too.
  4. Check your garden tools again. Do the hoes, spades and shears need sharpening, more cleaning?  
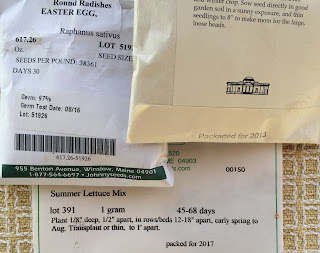
  5. Take a fresh look at the old seed packets you saved from last year.  How old are they really?     Seed companies typically print the year that seeds are
    meant to be used either near the top or bottom of a seed packet, sometimes on the front, sometimes on the back.  The tested germination rate for  its  intended year of sale may also be noted on the packet. Seed germination rates fall dramatically for some varieties after the first year.  For a quick check on how long seeds for the most popular vegetables stay viable, look at this article from Oregon's Extension Service. 
  6. Now take a deep breath.  If you have a heated greenhouse or grow lights in the cellar,  you might consider starting some cool weather vegetables like celery, onions, leeks, and lettuce for an actual early start on the growing season.  If you don't have a greenhouse or grow lights, don't plant any vegetable seeds yet.  Just keep thinking  about doing it for a while yet. 
Remember, spring is coming, and there will be even more things to do or not do in March.
Questions for our  subscribers:  1) let us know what garden activities  you are actually doing  now, and 2) do  you think that posting this type of a "to do" article is useful?  Please comment...  note that at the bottom of each post, if there are no previous comments, the phrase, No Comments, appears. Click on this to get the ball rolling.